
Few Singaporean homeowners are daring enough to venture into the realm of large-scale home DIYs, much less try their hand at renovation works for their homes. However, for Alim, the allure of designing his own space and embarking upon home projects has been a constant driving force since getting married and deciding to purchase his own home.
While Alim’s self-designed HDB resale in Yishun was largely renovated by his contractor, there’s one part of the 3-room flat that was not only envisioned, but entirely built, by the passionate homeowner himself.
With perseverance, focus, and a lot of sweat and tears, Alim managed to DIY an expansive wooden fluted panel wall in his living room for under $1.3k – less than half the amount he would’ve spent getting a contractor to build it for him.
Deciding to DIY his wooden fluted panel wall to cut reno costs
Inspired by the fluted panels trend and his own appreciation for the soothing ambiance of wooden interiors, Alim envisioned incorporating a Japandi-style wooden fluted panel feature wall into his living space.
 Alim’s render of the wooden fluted panel wall, made using Foyr.
Image credit: Alim Hussain
Since he chose not to engage an interior designer, Alim used 2D drawings along with renderings from 3D modelling softwares in order to convey his ideas to the contractor, whom he initially hoped would help build the fluted panel wall.
Alas, the high renovation cost estimate posed a hurdle to Alim’s plans. After contacting 2 different contractors – one of whom rejected his design idea, while the other quoted him $2,000 excluding the cost of the wooden panels – the Singaporean homeowner decided to take matters into his own hands.
In order to cut reno costs without sacrificing his vision of a wooden fluted panel wall, Alim chose to take a DIY approach instead. By sourcing for affordable materials and constructing the fluted panel wall by himself, Alim managed to keep his total expenditure below $1,300 – as compared to the estimated cost of nearly $3,000 if he had gotten a contractor to do the job.
Spent $675 on wooden fluted panels from Taobao
 Wooden fluted panels which Alim purchased from Taobao.
Image credit: Taobao
Like many others looking for affordable materials and supplies, Alim turned to Taobao to acquire the wooden fluted panels necessary for his DIY project. Since each panel had an approximate width of 15cm, Alim ended up purchasing a total of 45 panels for ~$15 apiece. He explained that in comparison, the panels would have been priced around ~$45 each if obtained locally.
Other supplies Alim obtained for the DIY project included:
- Plywood from Carousell ($196; he purchased 23 panels of different dimensions)
- Laminate from Shopee (~$50)
- An electric saw, max bond glue, screws, and hidden wall plugs from a hardware store near his home ($150)
- Concrete drill which he borrowed from his friend
Additionally, Alim added that goggles and masks were a must-have for the DIY project – they were an integral safety element that prevented him from inhaling wood shavings during the cutting and sawing process.
Took 3-4 days to construct the fluted panel wall
@_alimhussain Wasn’t confident embarking on this project. But turned out ok! What do you think? #reno #renosg #tiktoksg #firsthome #diy #resale #fyp #zyxcba
The initial phase of the DIY process involved precise measurements and calculations to determine the exact dimensions of the wooden fluted panel wall. This was crucial in ensuring that Alim purchased the correct quantity of materials; he accounted for a buffer amount as well, buying extra plywood and panels which proved to be a wise decision in hindsight.
 Plywood base layer.
Image credit: Alim Hussain
Alim officially kickstarted his DIY by laying down the plywood pieces over the areas he intended to place the wooden fluted panels. He elaborated on the importance of laying down a plywood base layer, explaining that it was an essential foundation, especially in older flats which tend to have uneven walls and exposed electrical trunkings.
After carefully checking the placement of the plywood base layer, Alim used a concrete drill to attach the plywood to his living room wall. Once satisfied that it was attached securely, he proceeded to laminate the outer surface of the exposed plywood.
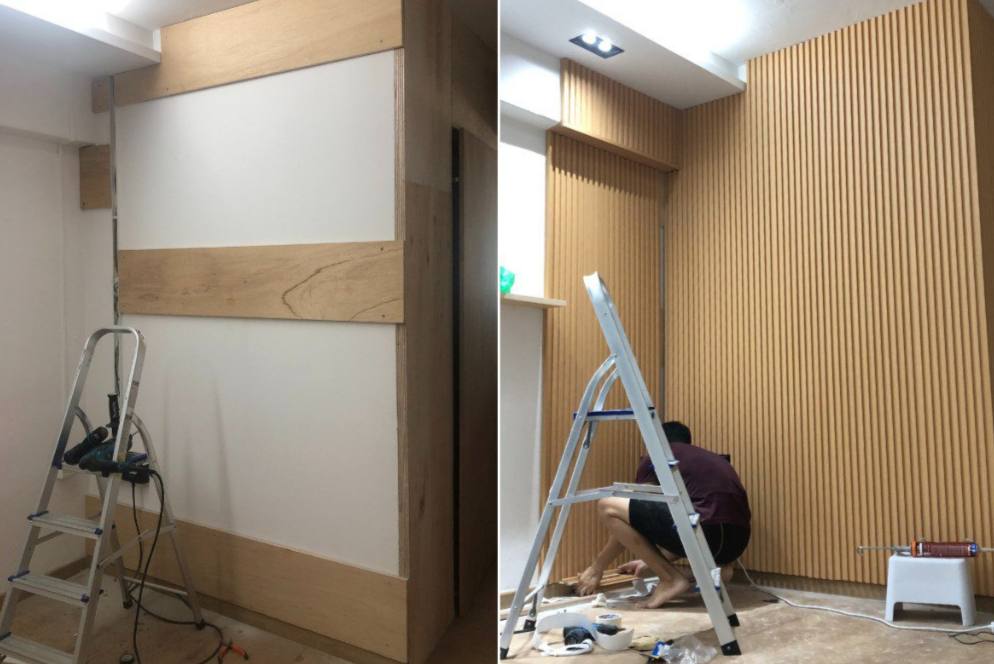 Before and after attaching the wooden fluted panels.
Image credit: Alim Hussain, Alim Hussain
The next step was measuring and cutting the wooden fluted panels using the electric saw that Alim had acquired. After hours of sweat, tears, and frustration, he finally mastered the technique of cutting the fluted panels to size.
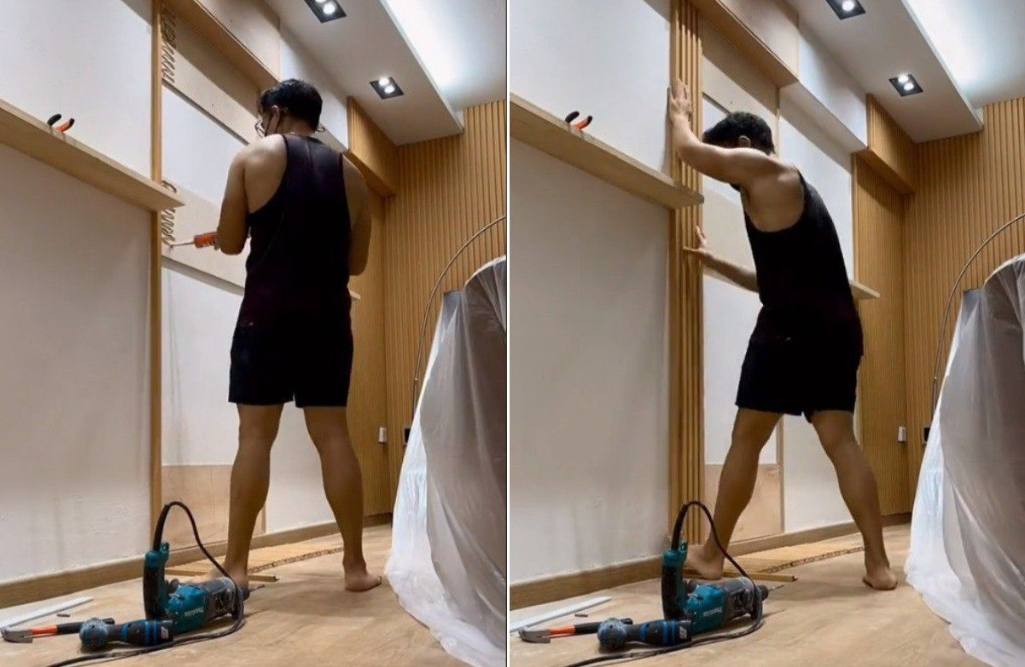 Glueing the wooden fluted panels and holding them in place.
Image credit: Alim Hussain, Alim Hussain
Attaching the panels to the plywood wasn’t simple either – Alim soon found that he needed to hold the fluted panels in place until the Max Bond Glue fully dried, in order for the panels to be securely attached. To save himself from the manual labour of holding each panel, Alim came up with the ingenious idea to prop the panels up using pieces of wood and other extra materials.
Difficulties transporting & cutting the wooden fluted panels
While the process may sound relatively straightforward, Alim encountered his fair share of struggles along the way.
@_alimhussain For those planning to buy the fluted panels from taobao and do self installation. The panels can’t fit in the lift 😂 #reno #renosg #tiktoksg #diy
The first hurdle he encountered was the size of the wooden fluted panels. While most of us are used to Taobao deliveries showing up directly at our doorstep, the wooden fluted panels were too long to fit into a standard HDB lift, leaving Alim with no choice but to lug the package up the HDB staircase, all the way until his resale flat.
 Measuring the wooden fluted panels and using the electric saw to cut them.
Image credit: Alim Hussain, Alim Hussain
Another struggle was getting used to using the electric saw. While the saw itself was relatively straightforward to operate, Alim admitted that a certain amount of physical strength was needed to control the blade of the saw and ensure that the wooden panels were cut in straight, even lines.
In addition to inevitably wasting several wooden panels that ended up with jagged or uneven edges, Alim also had several close calls with the blade of the electric saw. He recalled that safety was definitely a concern when embarking upon the DIY project, and cautioned others to handle the electric saw with utmost care.
DIY-ing a wooden fluted panel wall for under $1.3k
 Completed DIY wooden fluted panel wall in Alim’s living room.
Image credit: Alim Hussain
While Alim admitted that several regrets flitted through his mind during the physically taxing process of constructing and installing the wooden fluted panel wall, he ultimately found a deep sense of fulfilment in the entire endeavour. After all, there’s nothing more satisfying than witnessing your efforts come to fruition and seeing your own handiwork proudly displayed in your home.
Alim’s key piece of advice to homeowners looking to embark upon a similar project is to be mentally prepared for the level of difficulty and the challenges involved. “It’s not as easy as it looks,” he elaborated, “A lot of planning, effort, time, and perseverance was required.” Nevertheless, he offers a word of encouragement, ensuring aspiring DIY-ers that the end product will be well worth the effort.
For more on Alim’s home, check out @_alimhussain.
Discover more home DIYs:
- These Singaporeans made a stunning arched bookshelf from their IKEA bookcase
- 9 easy TikTok home decor ideas
- This Singaporean DIYed all the arches in her home for <$150
- These homeowners created a Japanese-inspired service yard in their HDB resale for <$2.2k
Cover image adapted from: Alim Hussain
Drop us your email so you won't miss the latest news.


